This book begins outside in the sunshine. Measurements made of shadows can trace the path of the sun during the day. If measurements begin early in the fall and continue throughout the school year, students will see changes in their observations that are caused by the change of season, as discussed in the next chapter. After the students understand how shadow measurements are made, classroom records may be kept with groups of students taking turns as the shadow measurers and recorders. They can then share their results with the class.
This chapter looks first at the phenomenon of shadows (how they are made), then uses measurements of shadows to track the motion of the sun across the sky. A companion activity done in the classroom uses an earth-sun model to reproduce the same pattern of shadows the students observed during the day. An outdoor model uses a small clear dome for the sky on which the students record the sun's path. Building and using a sundial is the last activity illustrating the sun's motion. Although probably less obvious to the students, the stars also follow a daily path. Like the sun, they rise in the east and set in the west. Two activities - one in which the students observe the motion of the Big Dipper during the evening and one which takes long exposure photographs of the sky - show the apparent motions of the stars.
The activities in this chapter challenge the students to quantify their observations, and in so doing, learn useful measuring and organizational techniques. The ability to measure and present data is an essential skill in any scientific investigation.
 A shadow occurs when an opaque object blocks light from the sun or other light source. Observing the behavior of shadows is an easy way to investigate some of the properties of light. Points to understand include:
Possible questions to consider and discuss: What makes a shadow? Do different kinds of objects make different kinds of shadows? Are shadows different colors? What makes a shadow disappear? What makes shadows at night? Do you have a shadow at noon? Where is the Sun at noon?
Activity 1-1: Making Shadows
This activity gives students a chance to experiment with different ways of making shadows. Shadows often tell as much about the light source as about the objects which cast them. Since light travels in straight lines, if we know where an object is and where its shadow is, we can determine where the light source is. We will use a stationary stick later in this chapter to record the motion of the Sun.
Materials: large pieces of chalk; paper; soap bubble solution; bubble blowers; pencils; markers; paints; various objects such as hoops, lace, balls, etc.
 What causes shadows to form? Was it easy or difficult to draw your own shadow? Were there shadows at noon? What happened to the shadow as you moved your hand closer or farther from the ground.
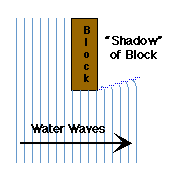
The students may have noticed that the shadows cast by objects farther from the ground are fuzzier than those cast by an object near to the ground. This is due to an effect called diffraction and is evidence that light travels as waves.
By placing a block of wood in a pool of water and sending waves towards it, one can see the waves bend around the edge. The farther the waves travel past the object, the more they bend into the "shadow" caused by the object. In the case of light waves, this effect causes fuzziness in the shadows.
While students are aware that day and night occur, they may not yet understand that these changes happen because the Earth rotates once every twenty-four hours. Day occurs when our side of the Earth faces the Sun and night occurs when our part faces away. As the day progresses, the Sun appears to follow a path from its rising in the east to its setting in the west. One way to record the Sun's path is to track the shadow cast by a stationary stick. By repeating the experiment periodically over the course of several months, the effect of the time of year on the Sun's path also should be observed. (These two activities are identical, except for the size of the group.) Important points to understand include:
Activity 1-2: Tracking Sun Shadows (Large Group)
For this activity, first find some open outdoor space - preferably in the school yard - that can be used every day. Be sure to choose a spot unobstructed by trees or tall buildings which would shade this area early or late in the day. When working with older students, it may be preferable to have them work in small groups to record their own Sun shadows (see small group activity below). The small group activity also may lend itself more naturally to long-term observations. If long-term observations are to be made, be sure to record the height of the shadowstick and to use the same one each time. The height will be very important for the activity "Measuring the Earth's Tilt" in Topic 5.
 | Be sure to remind students that looking at the Sun can cause permanent eye damage- Never look directly at the Sun! |
|---|
Possible questions to consider and discuss: What are some differences between day and night? Where does the Sun rise? Where does it set? Where is the Sun at noon? At midday?
Note: Due to daylight savings time, the sun may not reach its highest point in the sky until nearly 1:30PM depending on the time of year and your location within your time zone!
Materials: yardstick; large coffee can of soil or stones; large, flat sheet of cardboard or heavy paper (at least 2' x 3'); marker; and compass.
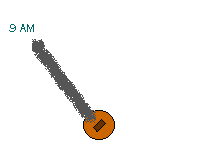
After a day of recording, connect the shadow ends recorded near noon time with a line. At Midday, the Sun is at its highest in the sky, and therefore corresponds to the shortest shadow. At this time, the Sun is due South, and so the shadow of the stick points toward the Earth's North Pole. Mark this North-South line. (If not measured, the locations of the noon and midday shadows can be estimated from the positions of shadows marked at nearby times.)
Compare the North-South line marked by the midday shadow with that marked with the compass. Do they agree? Discuss the difference between True and Magnetic North. A compass is simply attracted by the magnetic force. Demonstrate how a nearby magnet can easily fool the compass. Try making it point South by placing a magnet to its south!
If a computer is available, the length of each shadow could be measured and entered, along with its time, into a spreadsheet or graphing program (like AppleWorks, Excel, or Cricket Graph). The computer could make a graph relating the shadow length to the time of each observation. The data for each day could be saved and compared to later days. Even without a computer, a simple graph could be made by hand.
Discussion:
Discuss observations of shadow lengths. Questions might include: How do shadow lengths change during the day? Why do they change? Is there a pattern to where the shadows fall and their lengths? Why is there a pattern? Is the Sun directly overhead at any time? Why is the shortest shadow around noon? Why does the shortest shadow point North? Why doesn't it point in the same direction as the magnetic compass?
Activity 1-3: Tracking Sun Shadows (Small Group)
| | Be sure to remind students that looking at the Sun can cause permanent eye damage- Never look directly at the Sun! |
|---|
Materials (per group): short drinking straws; modeling clay; 9"x12" oaktag; large rock or brick; clear acetate as used with an overhead projector (if not available, use plain paper or tracing paper); compass; crayons and markers.
Activity 1-4: Day and Night on the Spinning Globe
In the previous activity, students saw how shadows changed during a day. This activity uses a globe and indoor light source to create a classroom model showing day and night on a spinning Earth. (We would like to credit A. Lane and S. Nocelben for first showing us this activity.)
Materials: Earth globe with string attached to North Pole; strong focused light source (such as an overhead projector, a flashlight, or a slide projector); golf tees; small figurines; fun tack or similar material.
How do we know if we're spinning the globe in the right direction? Where does the Sun rise if we were standing on the globe? Where does it really rise? Set? What if we spun the globe in the other direction? Would this also match our observations? It is only by such comparisons with observations that we can verify our models. Are the golf tee shadows longer or shorter at the equator? What about at noon, when the Sun is highest in the sky? Is there any shadow at the equator? What about at your latitude? Where do all the shortest shadows point? Does the pattern made by the golf tee reasonably match that made by the shadow stick of the previous activities? Might a spinning earth, then, not be a reasonable model for the passage of day and night? What if the Earth didn't rotate? What if the North Pole were pointed towards the Sun? Where would it be day and night? Would all locations still have both day and night?
Can you think of any other ways to test this model of a spinning Earth? Maybe shadow stick patterns from schools at other latitudes could be compared to yours. Are they consistent with the differences seen on the spinning globe? Have the students observed any complications which our model does not account for? (More on these, such as the tilt of the Earth in the next chapter.)
The activities of Topic 2 have shown us that observing the shadows made by the Sun during the course of a day provides information about time: the times of Midday, sunrise, and sunset, for instance. This topic further explores the path of the Sun in the sky, and how we might use this information to determine the current time of day. New ideas to be understood include:
Activity 1-5: Tracking the Sun's Path in the Sky
It is most appropriate for Grades 4-6 having completed the activities in Topic 2.
| | Be sure to remind students that looking at the Sun can cause permanent eye damage- Never look directly at the Sun! |
|---|
This activity allows us to track the apparent motion of the Sun in the sky on a model in which the plastic dome represents the sky. To do this, we mark the position on a clear dome which casts a shadow at the same central spot. As the Sun moves in the sky, so too does the position we must mark. For this activity, an outside spot must be picked which will not be shaded at any time during the day.
How does the Sun appear to move across the sky? How could shadows tell us about the Sun's position?
Materials: clear plastic dome (3" to 8" diameter or clear tops of "Leggs" pantyhose containers will work); grease pens or water-soluble markers; adhesive colored dots; (as an alternative to a plastic dome, a large kitchen strainer and sewing pins with large heads can be used); 9" x 12" oaktag or other stiff paper; compass.
You should be able to convince yourself that the marks placed on the dome correspond to the position of the Sun in the sky a those times. If an observer (maybe an ant) were to stand at the central dot inside the dome, then each time a dot was marked eclipsing the Sun (casting a shadow on the observer), the dot would have to be in the direction of the Sun. The position of the dot, then, would have to be the same as the Sun's apparent position in the sky.
Discussion:
What sort of path does the Sun follow in the sky? Did the Sun travel directly over the top of the dome? Where did the Sun begin in the morning? Where was it in the afternoon? What about at noon? At midday?
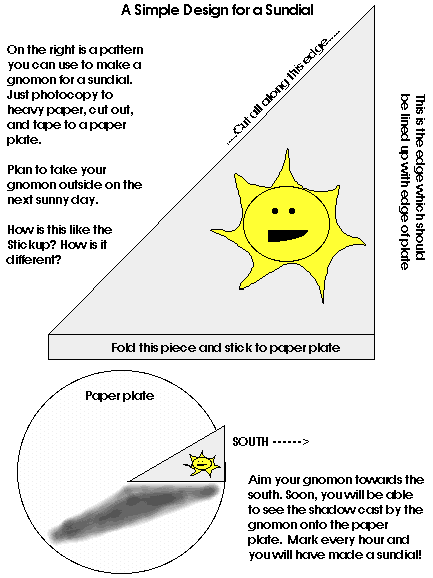
Activity 1-6: Building and Using a Sundial
A sundial is a device to measure time by the sun. It is made of two parts: a gnomon (NO-men) and a base. The gnomon casts a shadow on the base, a flat surface with markings indicating each hour. On a properly constructed sundial, the shadow of the Sun moves equal distances each hour. 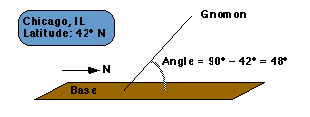 A sundial with a vertical gnomon will work perfectly at the North Pole because there the shadows cast will move equal distances each hour. But as one moves farther from the North Pole, the motion of the shadows varies more.
When you made the shadow stick measurements, you may have noticed that shadows separated by equal time intervals were rarely separated by the same distance. One solution to this problem is to tilt the gnomon so it is aligned as it would be if it were vertical at the North Pole (i.e. parallel with the Earth's axis). Knowing your latitude is all that is necessary to find the correct angle to tilt your gnomon. Since the latitude of the North Pole is 90° (N), just subtract your latitude from 90° to find the angle to tilt the gnomon (refer to the table of latitudes of major U.S. cities). The gnomon should point towards North .
You may want to repeat the shadow stick measurements in Topic 2 at the same time as the sundial measurements to see the difference of a vertical stick and one tilted to match your latitude. Instead of tilting a stick, we will use the "tilted" edge of a triangle for our sundial gnomon.
Materials: scissors, enclosed cut-outs, protractor, oaktag (or other heavy paper), popsicle sticks, graph paper.
Count how many squares the shadow moves each hour. Compare how the triangle gnomon measures the hours compared to how the vertical shadow stick measures the hours. In which direction did the shadow appear to move? What if the sundial were in the Southern Hemisphere? Did you ever wonder why clocks run "clockwise"? Before mechanical clocks, people used sundials, which, as we have seen, run clockwise in the Northern hemisphere.
Before the establishment of the standard time zones we know (Eastern, Central, Mountain, and Pacific for the continental U.S.), each city kept its own time based on the observations of the Sun. We have seen how to find midday. Try keeping your own time based on your observations of the Sun by setting noon to midday. How close to the "standard" time are you? Where else on the globe should have the same "local" time as you? Are there any advantages to keeping your own solar time? What about disadvantages? Why might we have standardized on time zones?
These activities are appropriate for students in grades 4-6 and may require the enlistment of parents for assistance.
Students may be ready to make night time observations. Just as the rotation of the Earth makes the Sun appear to travel through the sky, so too do the stars at night seem to move. And just as the motion of the Sun can be used to track the passage of time, so too can the stars help us tell time.
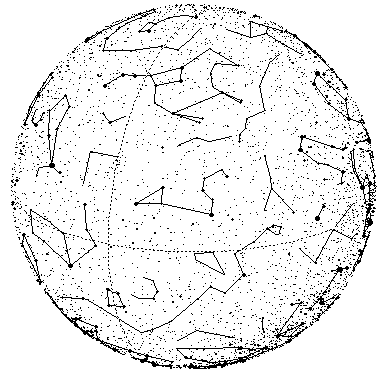
We know now that the night sky is filled with stars like our sun which are so far away that they look like tiny bright dots. These tiny dots make up a pattern on the sky which does not change on the scale of our short lifetimes; thus, they are a nice wallpaper we can use as a backdrop for other experiments.
One of these experiments is to find the point in the sky under which the Earth does not seem to move, or the point of the sky which seems to neither rise nor set. In other words, the point right above the North Pole. The figure shows why this is true. The wallpaper of stars seems to fly across the sky to observers along the Earth as the Earth rotates its night and day underneath it. However, at the poles, the observer is simply spinning right underneath a specific point, and if he looks straight up at a star, that star does not sweep out an arc like the rest of the stars. You can imagine spinning on a merry-go-round and noticing that if you are sitting in the very middle and looking out, the playground seems to fly around you; however, if you look up, a cloud in the sky seems to stand still.
On a spinning Earth, observers looking further away from the center of the spin axis see the wallpaper of the sky rush around them in a day, while observers looking up near the spin axes (the poles) see the wallpaper move less and even see that stationary point which is like the cloud from the merry-go-round example. Only over the North Pole is there a star roughly at that stationary point. It is called Polaris, the Pole star.
Important points to stress include:
Activity 1-7: Simulating the Motion of the Stars
Before the students try observing outdoors, it is important
that they know what to look for. 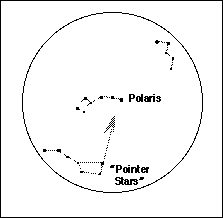 Even professional astronomers prepare and study star maps before a night of observing. This simple activity helps familiarize students with the apparent motions of the stars and the underlying reason for this motion.
Materials: adhesive dots (brightly-colored or glow-in-the-dark, if possible) or a means of projecting a star map onto the ceiling
Can the students predict how the stars' motions would differ at their location? What about at the Equator?
Activity 1-8: The Big Dipper Clock
The previous activity showed the students how the rotation of the earth causes the stars to appear to move in the sky. Now it is time to try some night time observing. First the students should find the Big Dipper in the sky. The constellation guide from the previous activity can be used as a guide to find the Big Dipper in the classroom with the students. These patterns will help them to find the Big Dipper and the North Star (Polaris). The dotted line directs them from the Big Dipper to Polaris. If we extend the north/south axis about which the Earth turns, it would point to Polaris. As we saw already in the previous activity, as the Earth turns, Polaris does not appear to move, while the other stars appear to move around Polaris. (Native Americans called Polaris "the star that does not walk around".) Since the Big Dipper is easily recognizable, one can follow its motion around Polaris as if it were the hour hand on a twenty-four hour clock.
Materials: Big Dipper Finder; brass fasteners.
Could the students find the Big Dipper? Polaris? Did the Dipper appear to move around Polaris? Could it be used as a clock? All of the Big Dipper may not always be visible from your location (it's certainly not visible during the day); when might it still be a useful clock?
Activity 1-9: Photographing Star Trails
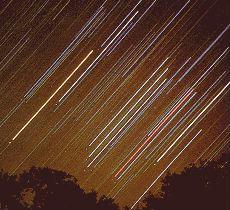 Some teachers and older students may wish to photograph the sky. By making a long exposure of the sky, the stars will leave trails as they move during the course of the exposure.
Materials: Camera with manual shutter setting; ASA 400 (or faster) film; tripod.
Do the lengths of the arcs change with the exposure time? In what way? Why? Are the arcs closer to Polaris longer or shorter than those farther away. Why? What could we do if we wanted to take a long photograph without the star trails? What would a meteor look like in the picture? What about an artificial satellite?


 |
Home
|
Home